
Which Shooting Mode do I use most ?
There are always questions asked about which is the best mode to use your camera, should you use Aperture Priority, Shutter Priority, Manual or Program mode. In this post I detail my favourite mode.
A little about exposure modes and exposure
In Aperture priority mode, A or Av, you control the aperture value for creative purposes, selecting a wide aperture (low f-number) for narrow depth of focus and blurry backgounds or a narrow aperture (high f-number) to get more of the subject in focus. The difference in depth of focus between having the aperture set at f/2.8 and f/16 is shown in the two images of the Datacolor Spyder LensCal below. Note the differences in sharpness on the ruler markings.

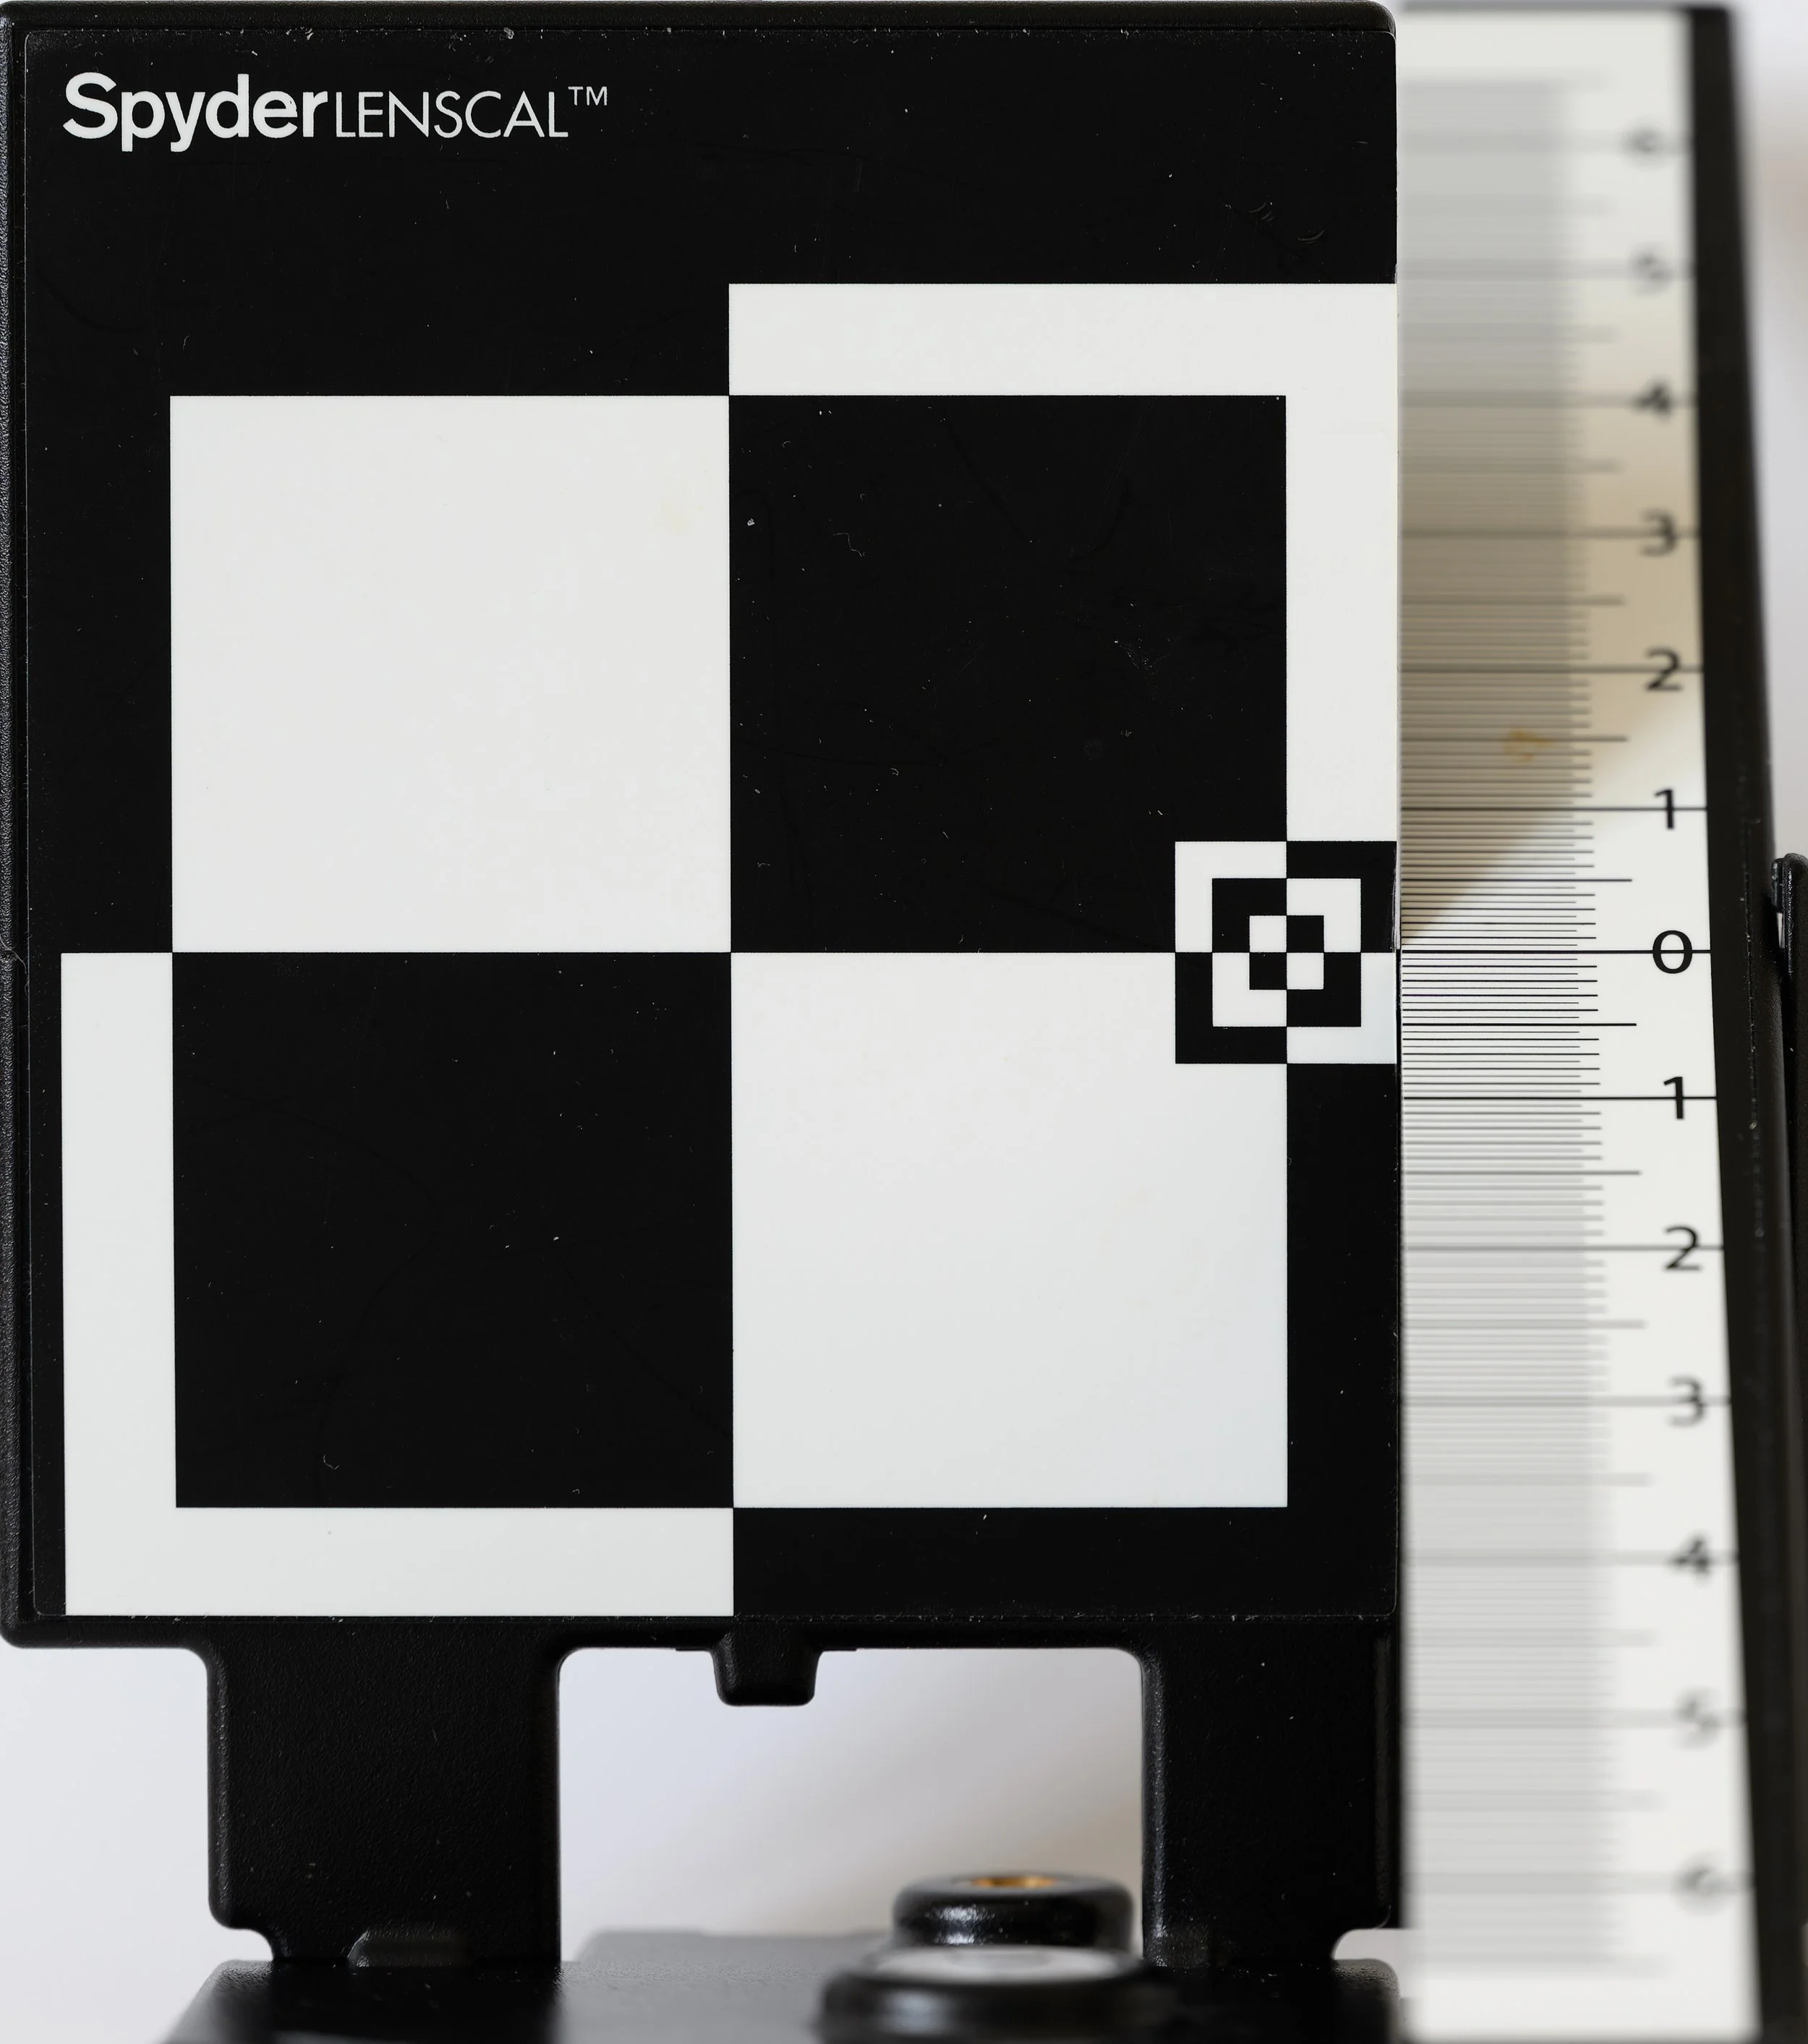
f/2.8

f/16
In Shutter priority mode, S or Tv, you control the shutter speed value for creative purposes, selecting a fast shutter speed to ensure everything is sharp and frozen in time or a slow shutter speed to intentionally blur the motion to convey a sense of movement. In the images of the waterfall, below, the differences in appearance between shooting at 2 seconds, 1/30th of a second and 1/2000th of a second are clear.

Shutter Speed: 2 seconds

Shutter Speed: 1/30 second

Shutter Speed: 1/2000th second
But what if we want creative control over both aperture and shutter speed. For example, assume we are trying to shoot an image of a flying bird in front of a cluttered background. In this case we require a fast shutter speed to freeze the motion of the bird and a wide aperture to blur out the cluttered background. We can easily select either option using A or S mode, but not both - if we select one we then rely on the camera to choose the other.
This is where manual mode comes in. In manual (M) we select both the shutter speed and aperture values to achieve the creative control that we require. We balance the shutter speed and aperture to get the correct exposure not the camera. If there is insufficient light we can bump up the ISO sensitivity to achieve the exposure we want. For fast moving action though we want to be able to react quickly if the light changes. Say, for example, our fast moving bird is flying in a brightly lit area and we set up the camera to achieve the correct exposure. As we are ready to take the shot the bird flies into a shaded area and out image becomes underexposed. We want to keep the shutter speed and aperture set for creative purposes but can’t raise the ISO quick enough (button press and dial, or worse still entering the menu system) before the opportunity has passed.
This is where manual with Auto ISO mode reigns. Here we set Shutter Speed and Aperture to achieve the look that we want but the ISO value serves no creative purpose, just the sensitivity of the sensor. We can let the camera control the ISO to balance out the exposure and compensate for any changes in light levels. In our flying bird scenario, we set the shutter speed to a sufficiently high value, say 1/3200s, and our aperture to its widest value. The bird starts out in bright sunshine and the camera sets a low ISO as the light levels are high enough. As the bird flies into the shade the light levels drop, the camera immediately boosts the ISO setting to compensate and we continue shooting without the risk of under exposure.
The benefit here is that for a given shutter speed and aperture value the camera will automatically select the lowest ISO necessary to achieve the necessary exposure. We don’t have to change any settings to get the picture we want.
Another benefit is that, unlike fully manual mode, exposure compensation works with manual mode with autoISO. You can adjust the camera’s calculated exposure to take light or dark backgrounds into account. Exposure compensation simply raises or lowers the ISO as instructed, leaving all creative control of the image as you wanted.
Setting AutoISO
I use Nikon cameras so the following shows how to set up AutoISO in the Nikon Z9 menu.
In the Photo Shooting menu, scroll down and select ISO Sensitivity Settings. The following menu screen is shown:
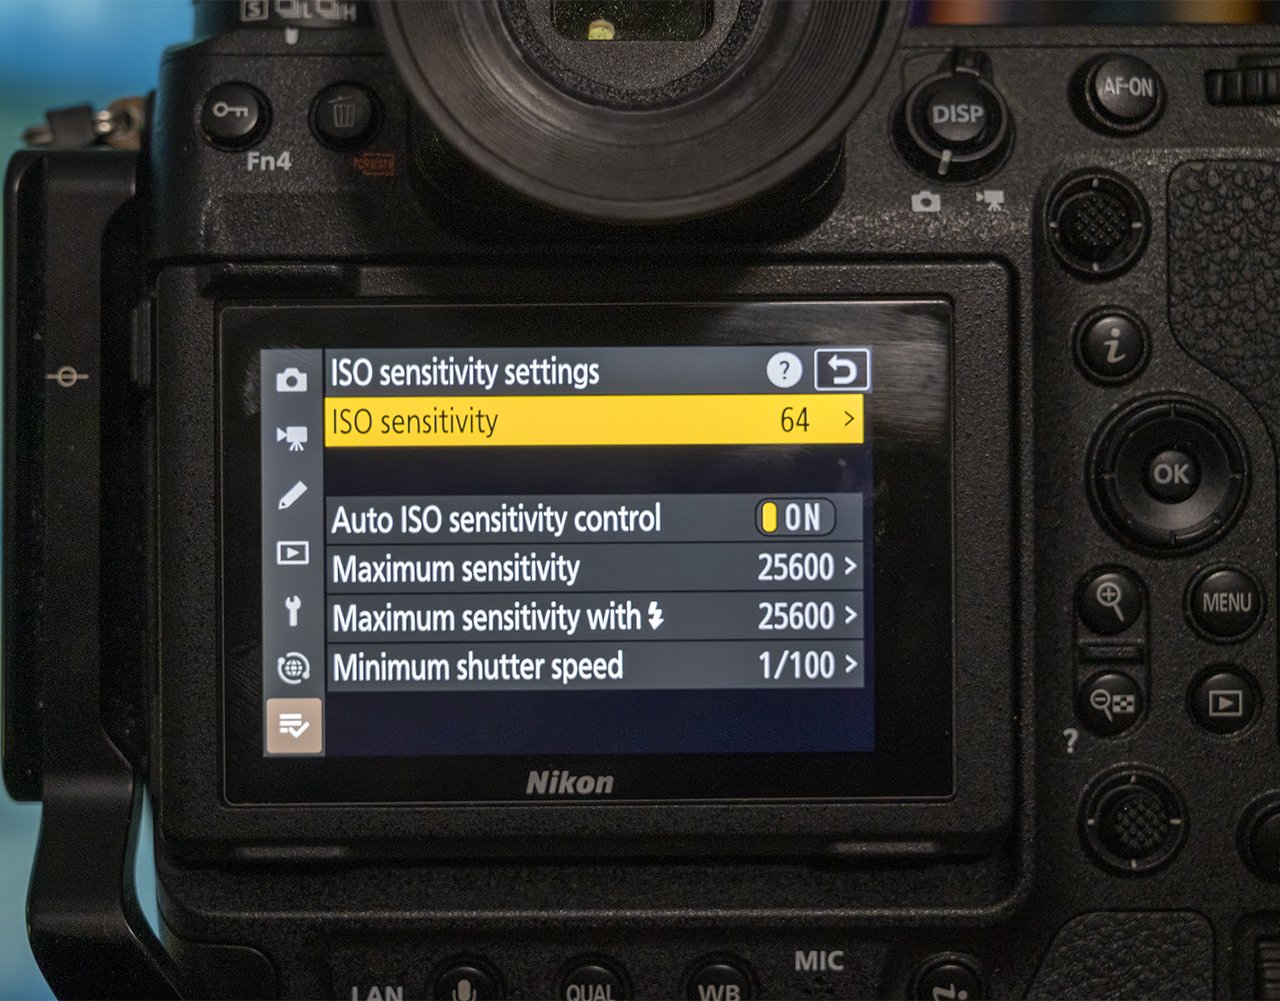
If the bottom section of the screen is not shown or greyed out make sure that Auto ISO sensitivity control is turned ON.
ISO sensitivity - this is the minimum ISO the camera is allowed to choose. I set this to the native ISO for the camera. In the Z9 this is IsO 64.
Auto ISO sensitivity control - turn this ON
Maximum sensitivity - set this to the maximum ISO you are willing to use. I have no issues allowing the Z9 to raise the ISO as high as ISO 25,600. I know that the image will be noisy but, if the exposure is correct, I can clean the images up using either DXO PureRaw 4, Lightroom deNoise or Topaz PhotoAI.
Maximum sensitivity with flash - I just leave this at the same value as the previous item. it is rare that I use flash with autoISO.
Minimum shutter speed - this doesn’t have any effect in manual mode since you set the shutter speed yourself. it can be useful if you have aperture priority mode selected since you can specify a particular value so that the camera shouldn’t go slower than this speed. A useful setting is Auto, where the camera selects the minimum shutter speed based on the 1/focal length rule so, for example, if you have a 400mm telephoto lens attached the shutter speed will not fall below 1/400s.
That’s all there is to it. If you have any comments or thoughts let me know.