
Manual GOTO for the Star Adventurer 2i
As a relative beginner to astrophotography I had trouble identifying the locations of objects in the night sky. I was okay with common stars like Polaris or constellations like Orion and the Great Nebula, Cassiopeia and the Big Dipper but anything else was a mystery. Programs like Sky Guide, Sky Safari or Stellarium can help you find objects but with a manual star tracker how can you be sure you’re pointing at the correct part of space, especially with long focal length lenses?
A 400mm lens on a full frame digital camera like my Nikon Z7ii has an angle of view of approximately 5 degrees. If you hold you arm outstretched in front of you with your hand raised, 5 degrees is roughly the width of three fingers, as shown below

If you consider this for a moment it soon becomes clear that arbitrarily pointing a camera and lens at the sky and correctly finding and composing your subject is going to be a challenge. This can be more difficult when using an equatorial mount like a star tracker since you can’t just point the camera - you need to think and move in equatorial coordinates of right ascension and declination. After many hours searching through internet forums and YouTube videos I have found a pretty accurate but simple way of “upgrading” the Star Adventurer 2i to have a manual PushTo version of the GOTO systems used by more expensive computerised mounts.
I’m not claiming that I have invented this system - it is based upon tips and setups by Kamil Pekala and Oz Taylor.
The Basics
Every item in the night sky can be found from a combination of Right Ascension (RA) and Declination (DEC). These are equivalent to longitude and latitude coordinates on earth.

A Declination of 0° represents the celestial equator, while positive declinations point to objects to the north of the celestial equator and negative to the south. At the extremes +90° refers to the north celestial pole (NCP) and -90° refers to the south celestial pole (SCP). Declination values are subdivided into degrees, minutes and seconds eg Vega's declination, in the north, is +38° 47′ 1″, while Alpha Centauri's in the south is –60° 50′ 2″.

This Stellarium image shows the sky bisected by the celestial equator with hours of right ascension (RA) labeled along the top and declination (Dec.) at left. The coordinates of the bright stars Betelgeuse and Sirius are also shown.
Right Ascension (RA) is a little more tricky to visualise. With earth bound longitude, the zero point is based at Greenwich in the UK (the Greenwich Meridian) and locations are a number of degrees either east or west of this point. For RA, however, where is the 0° mark in the sky separating east from west? It's defined to be the point where the Sun crosses into the northern hemisphere on the vernal (spring) equinox, currently located within the constellation of Pisces. Unlike longitude which is measured as being east or west of the Greenwich Meridian, RA is measured in just one direction — east. Also RA is measured in hours rather than degrees - similar to time zones.
The sky can be treated as a clock, so the zero point of right ascension is called "0h" or "zero hours". Because there are 24 hours in a day, RA is measured from 0h to 24h with each hour of right ascension measured along the equator equaling 1/24th of a circle (360° divided by 24) or 15°. That is roughly the distance between outstretched index and pinky fingers in our earlier diagram, or a little more than one-half the width of the W-shaped constellation Cassiopeia. An RA of 1 hour then refers to a point 15° east of 0°, 2hrs refers to 30° east of 0°, etc.
In keeping with right ascension's time theme, hours are subdivided into minutes and seconds. The North Star Polaris, for example, is located at RA 2h 41m 39s.

Another view from Stellarium, this time showing the north celestial pole (NCP) and polar regions. Declinations are labeled every 10° and the hours of right ascension are shown around the circle. By convention, 0h is used instead of 24h.
The RA is useful because it is constant for a distant star or object. If you know the star’s RA and want to know where the star is relative to your position, you have to know the date and hour at your current location, and you can't easily visualise its position. This is where the Hour Angle (HA) becomes more practical as it is based upon your position and current date and time. The local Hour Angle is calculated as Local Sidereal Time – Right Ascension. The hour angle depends on where you are as well as where the star is located, since your sidereal time changes with longitude. The HA runs from 0h to 24h but in the opposite direction to RA. The 0h line is based at your current location, with 1h being 15° west of your position (if you remember RA runs eastwards), 2h being 30° west, etc.
Unlike RA, the HA for a particular star is not constant since the local sidereal time of your location is changing. Apps like Stellarium provide a display of the HA for a large library of stars and deep space objects that you can access in real time. This is much easier to visualise and comes in handy because the Star Adventurer 2i has Date and Time setting circles that allow you to move to a particular Hour Angle.
Using HA and DEC with the Star Adventurer 2i
The Star Adventurer 2i is equipped with setting circles on the RA axis. These are designed to assist in polar aligning of the mount but we can use them to “dial in” the current hour angle for the object we wish to view. The DEC axis is not provided with a scale but there are a number of websites offering a protractor scale that can be printed off and glued to the DEC bracket provided with the Star Adventurer 2i

The protractor needs to be printed out with a width of 11.1cm so you will need to check the scale used by your printer
Print out the protractor and glue it to the DEC bracket. Make sure that the central 90° is aligned as shown. I have a Leofoto PAN-02 clamp fitted to my DEC bracket with bubble levels so it is easy to make sure that the 90° is lined up perpendicular to the bracket, turn the pan clamp though 90° and make sure that the two 0° marks are correctly aligned. I have included a bent white paper clip trapped between the PAN-02 clamp and the DEC bracket as a pointer

Declination protractor glued onto the fine adjustment plate of the DEC bracket. Note the paper clip used as a pointer. The paper is covered with Sellotape to provide some measure of water protection but the surface texture of the bracket isn’t ideal for the tape to adhere. (Ignore the messy sellotape as this was tidied up later with a craft knife)
We next need to “calibrate” the RA system.
Firstly set up the system and level the mount/tripod.

Working from the front of the Star Adventurer loosen the RA clutch and rotate the RA axis until the counterweight shaft is horizontal as shown above and measured with a bubble level. Then lock the RA clutch. This is our 0 position.
With the RA clutch locked rotate the Date Setting Circle until the large line next to the 0 on the innermost circle lines up with the 0 on the outermost Time Circle, as shown below. After this point be careful not to accidentally move the setting circle.

Zero position with end December line on Date Circle aligned with 0h on Time Circle.
We can now make use of the fact that the Date circle runs from 0 - 12 like a clock, such that a full rotation of the RA axis will rotate 12 date units or 360°. 24h on RA is therefore equal to 12 units on the Date circle, so 1h of RA will be equivalent to ½ unit on the Date circle.
This is only approximate because the date divisors actually represent months of the year and different months have different numbers of days so they aren’t actually equal divisions. they are however good enough for our task. (We could have used the actual time circle fixed to the Star Adventurer 2i body but this doesn’t run a full 24 hours).
To convert the HA from Stellarium into a value for our setting dial we simply divide by 2, so an HA of 2 becomes 1 unit, HA of 3h becomes 1.5 units etc.
Now, if we pay close attention to the setting circle, below, we can relate the divisions and subdivisions to hours and minutes. For example there are 15 subdivisions between the long line between 12 and 1 and the long line between 1 and 2. We can interpret this as 4 minute intervals. Also the 1 represents the hour value for the next long line going clockwise
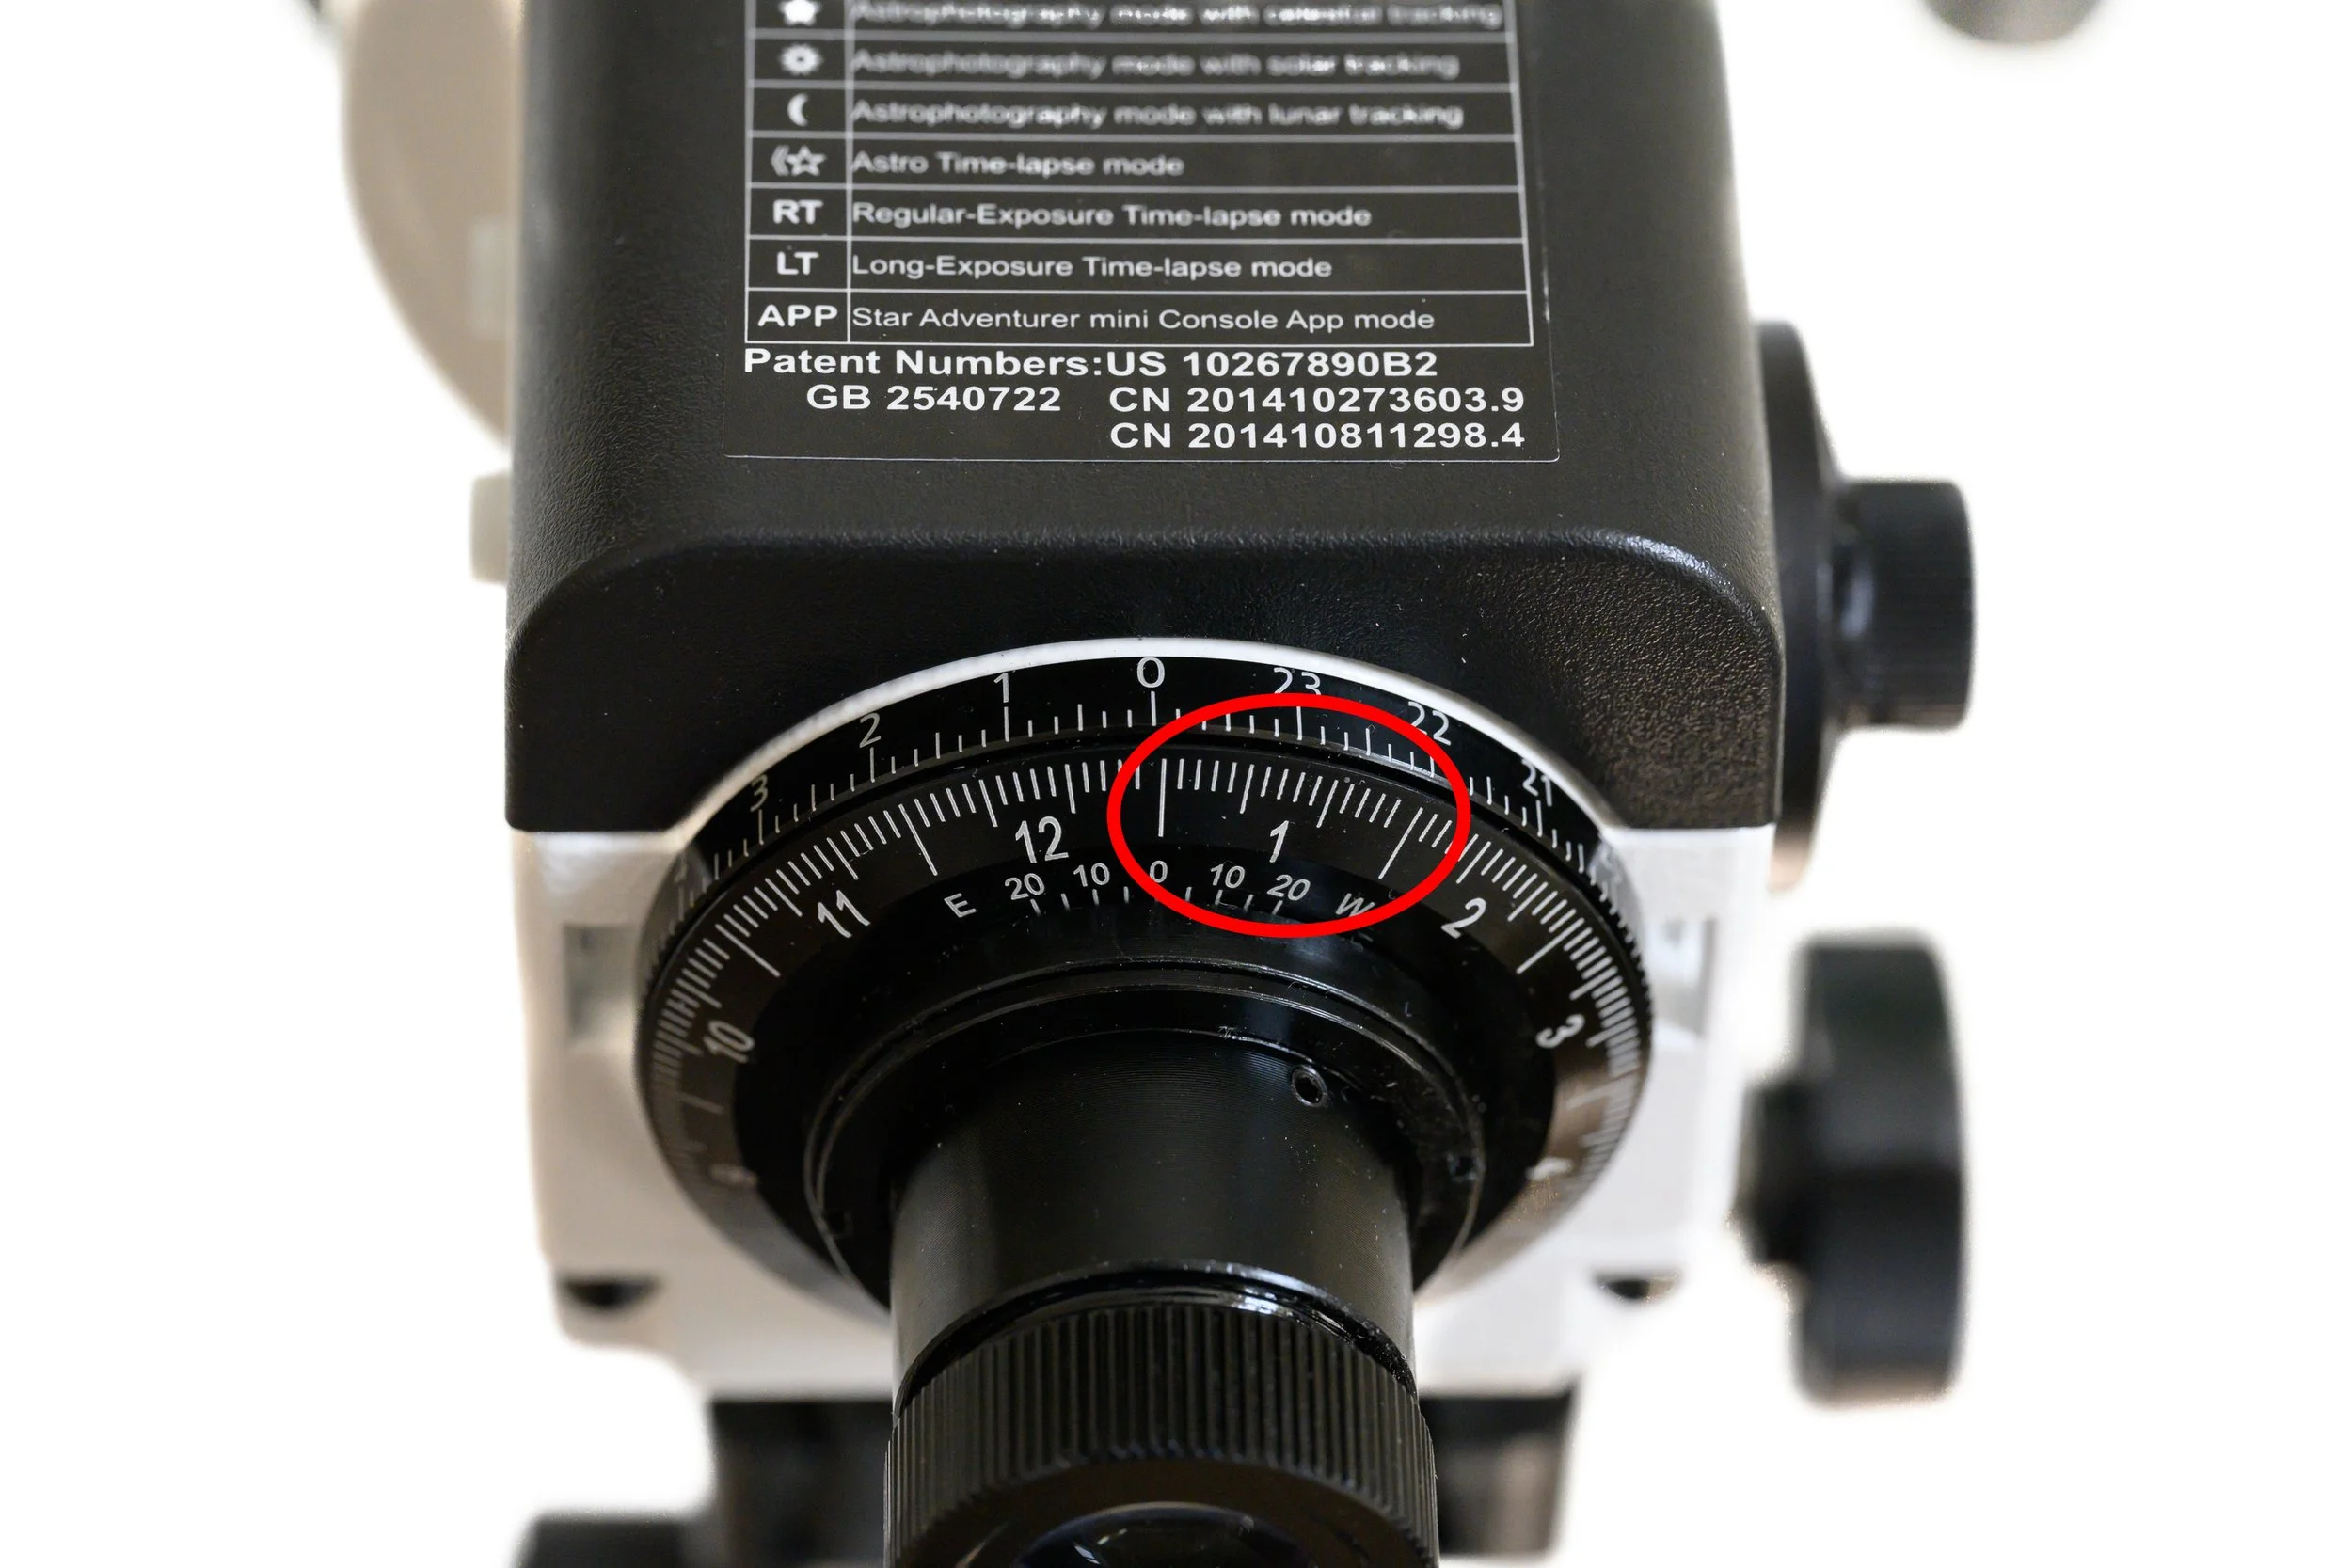
Each of the 15 small subdivisions represents 4mins between 0h and 1h

The next main division clockwise after the number 1 represents a full hour of our units, similarly the next major division after the number 2 represents 2h of out units
Using Stellarium or another astronomy app we can find the hour angle for a particular star, say Arcturus, which at the time of writing had an HA of 2h 10’ 0’’. If we divide this HA value by 2 we get 1h 5’ 0’’. We can therefore turn the RA axis counterclockwise until the 1h 5’ mark lines up with the zero indicator on the outer circle. This value will be just after the first subdivision following the first main hour division.

RA axis rotated to 1h 5’ 00” (ie just after the first 4 min subdivision after the 1h major division) representing an HA value of 2h 10’ 00'“
Below is another example, the Star Adventurer 2i has been rotated to 7 subdivisions after the 6h major division giving a value of 6h and 7x4 minutes or 6h 28’ 00”. This is equivalent to an HA value of 12h 56’ 00”

You can see how the setting circles can be used to move the Star Adventurer 2i to the correct HA (and therefore RA) of the target star. it should be emphasised again that this is only a rough measurement but will get you in the correct area of sky.
Now we have the correct RA for the target we can switch to the DEC alignment. This is much easier since we have fitted the angle protractor scale to the DEC bracket. It’s a simple matter of turning the fine tune knob on the DEC bracket to align our pointer with the correct angle. But the DEC protractor runs from 90° to -20° in two directions, so which is the correct one?
Generally, when looking down from above you should turn the knob so that the pointer moves in a counter clockwise direction (or to the right when looking from the front ) as shown below. In this example the DEC has been set to 60°. (ignore the scale on the PAN clamp - this isn’t used).

Dec fine tune plate rotated to a DEC of 60° as shown by the paperclip pointer.
(Note that I only use the PAN-02 head to switch between orientation of the camera 0° for telephoto lenses with integral feet and 90° when using the l-bracket fitted to the camera body).
With this setup method there may be times when the camera isn’t in a suitable position. At high HA settings the camera may be rotated underneath the Star Adventurer and may be obstructed by the tripod, or difficult to use upside down for example. We can overcome this by what is known as a Meridian Flip.
The meridian is a line that goes from the North Celestial Pole directly above your head down past the celestial equator to the Southern Celestial Pole (if you live in the Northern hemisphere). If an equatorial mount continues to track an object past the meridian the telescope would eventually rotate far enough to hit the base of the mount or tripod. To avoid this, the mount needs to do a (180 degrees) flip as it crosses over the meridian. In other words the scope needs to point up instead of pointing down once it passes the meridian. Many mounts do this automatically but we can do the same thing manually with our Star Adventurer to position the camera better.
If the HA provided by Stellarium is greater than 12h we can simply subtract 12h before we divide by 2.
For example, if a star has an HA of 16h 30’ 00” we can subtract 12h to get 4h 30’ 00”. We then divide this by 2 to get our setting value of 2h 15’ 00”
If we do this meridian flip, however, the DEC bracket will be pointing in the wrong direction as we have rotated the RA by 180° but not the DEC. In this case we must change the DEC value to use the clockwise direction so if the DEC was originally 60° counterclockwise it now becomes 60° clockwise.
We can now set the Star Adventurer 2i to have the correct HA and DEC values.

Here the Star Adventurer has been set to the HA and DEC coordinates for Vega and as you can see the camera would be pointing towards the chosen star.
I also tested out by tracking the moon. I set up the mount to point towards the moon before it had risen and set tracking to lunar. Over the next 4 or so hours the mount tracked the moon as it rose above the horizon and climbed in the sky. It wasn’t perfect by any means, but over those four hours the moon remained almost dead centre in my 400mm lens field of view
It is worth pointing out again that this will be an approximate alignment due to errors in the setting up, misalignments when printing or gluing the DEC protractor onto the mount, etc. It should get you in the ball park of your target star though. Even so, if you have a telephoto zoom lens attached to your camera it would be worth starting out at a short focal length and taking a photo to check that your subject is in the frame, then fine tune the RA and DEC using the slewing buttons and fine adjust knob.
Happy hunting.
If you find this helps please leave me a comment.