
Sky Watcher Star Adventurer GTi
A few months ago, I placed an order for the Sky-Watcher Star Adventurer GTi, the latest in their Star Adventurer series of star trackers. Let’s see if it has met my expectations.
I have previously been using the Sky Watcher Star Adventurer 2i as a beginner to astrophotography and have previously written here about my experience with it and how it has been modified to provide a rudimentary manual GOTO system for finding targets in the night sky. In late 2022 Sky Watcher released a new star tracker, the Star Adventurer GTi, featuring a revised design and a computerised GOTO system. Early reports suggested some issues with the system, especially regarding the backlash in the RA system and inability to permanently correct for this, but in mid 2023 the Star Adventurer GTi was updated and seems to have corrected this issue. You can tell the updated version as it is supplied with two counterweights (0.7kg and 1.6kg) rather than the single 2.3kg counterweight of the original system. This post provides my initial thoughts about the revised Star Adventurer GTi
Design and Build
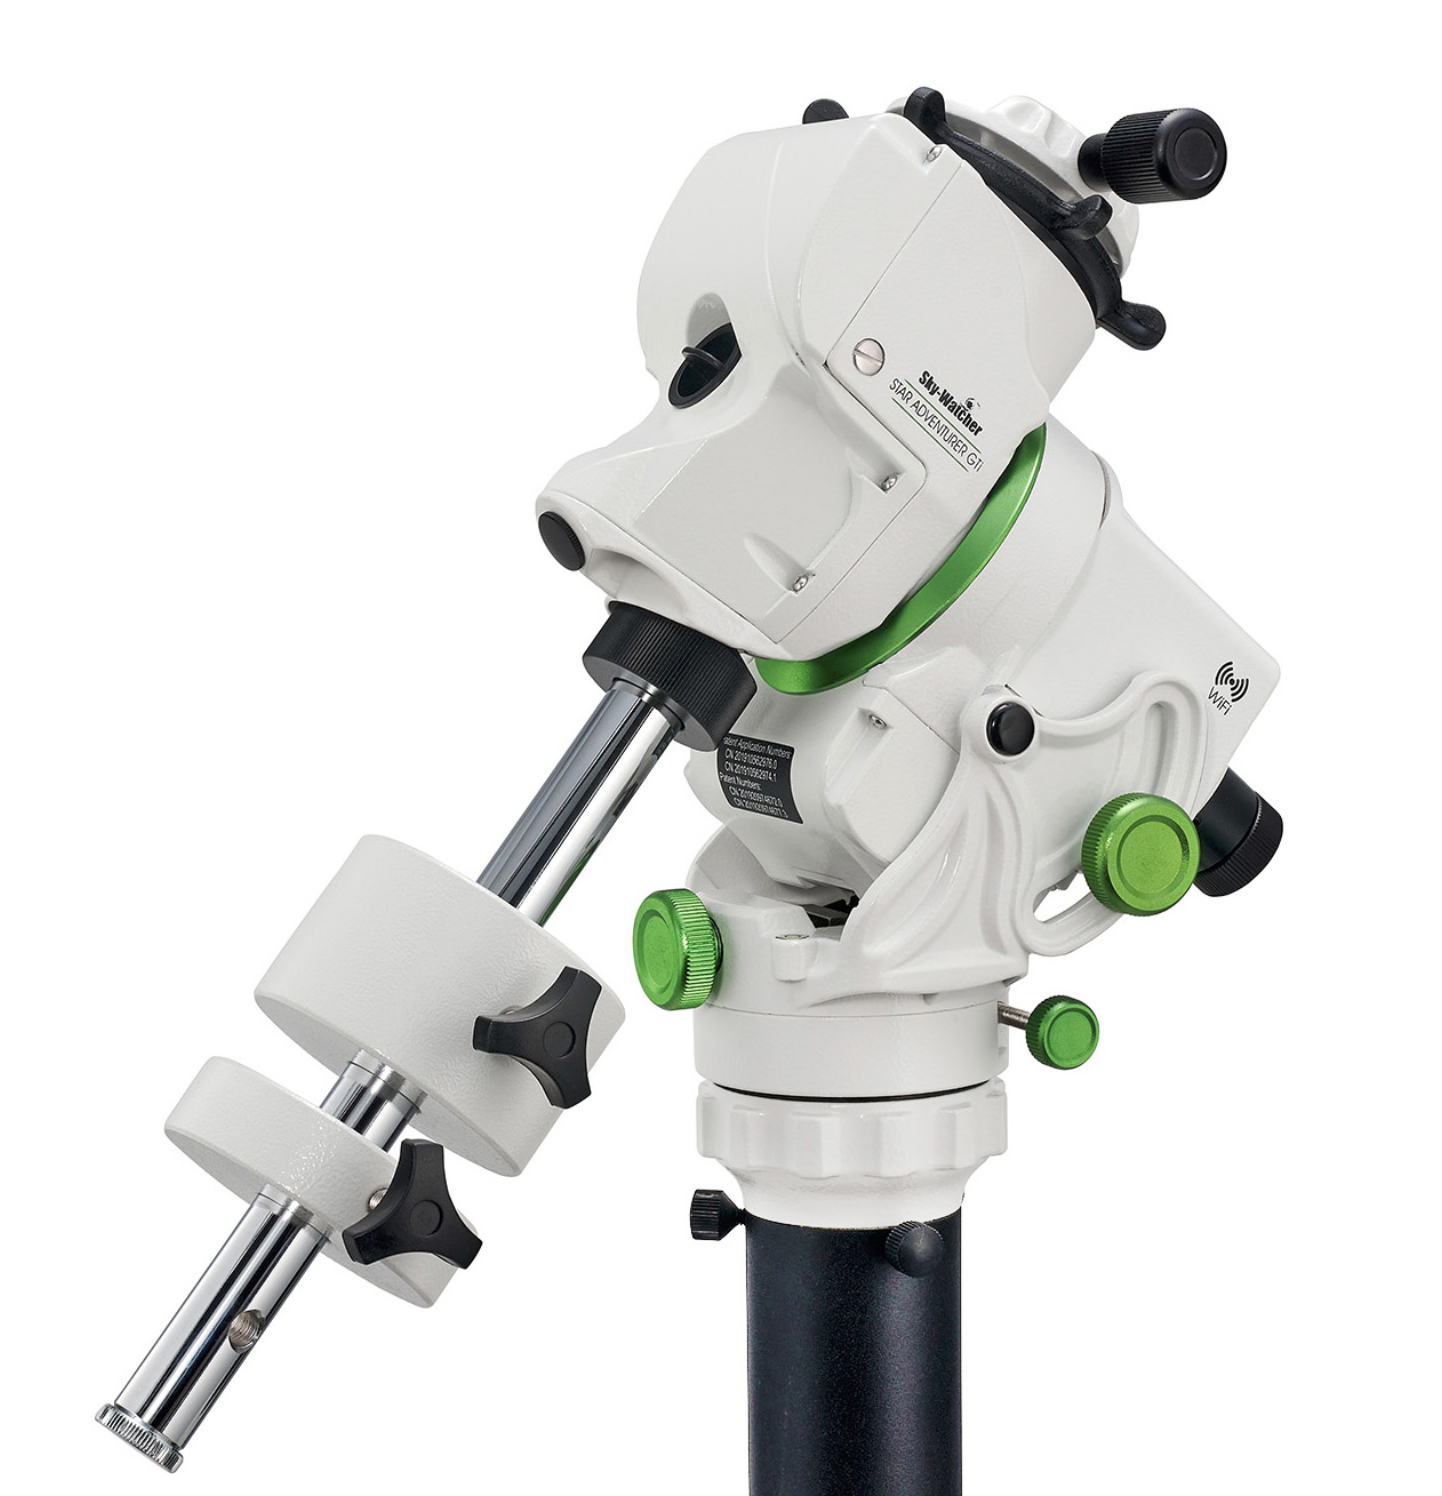
The Star Adventurer GTi is a clean design with no external wiring which has to be connected in the field. It maintains the white and black colour scheme of the Star Adventurer 2i. The GTi is easily recognisable as a Sky Watcher model as it shares the same overall look as their previous equatorial mounts, just scaled down somewhat. The main feature I’ve been looking forward to is the addition of a declination axis motor coupled with full computerised GOTO capability.
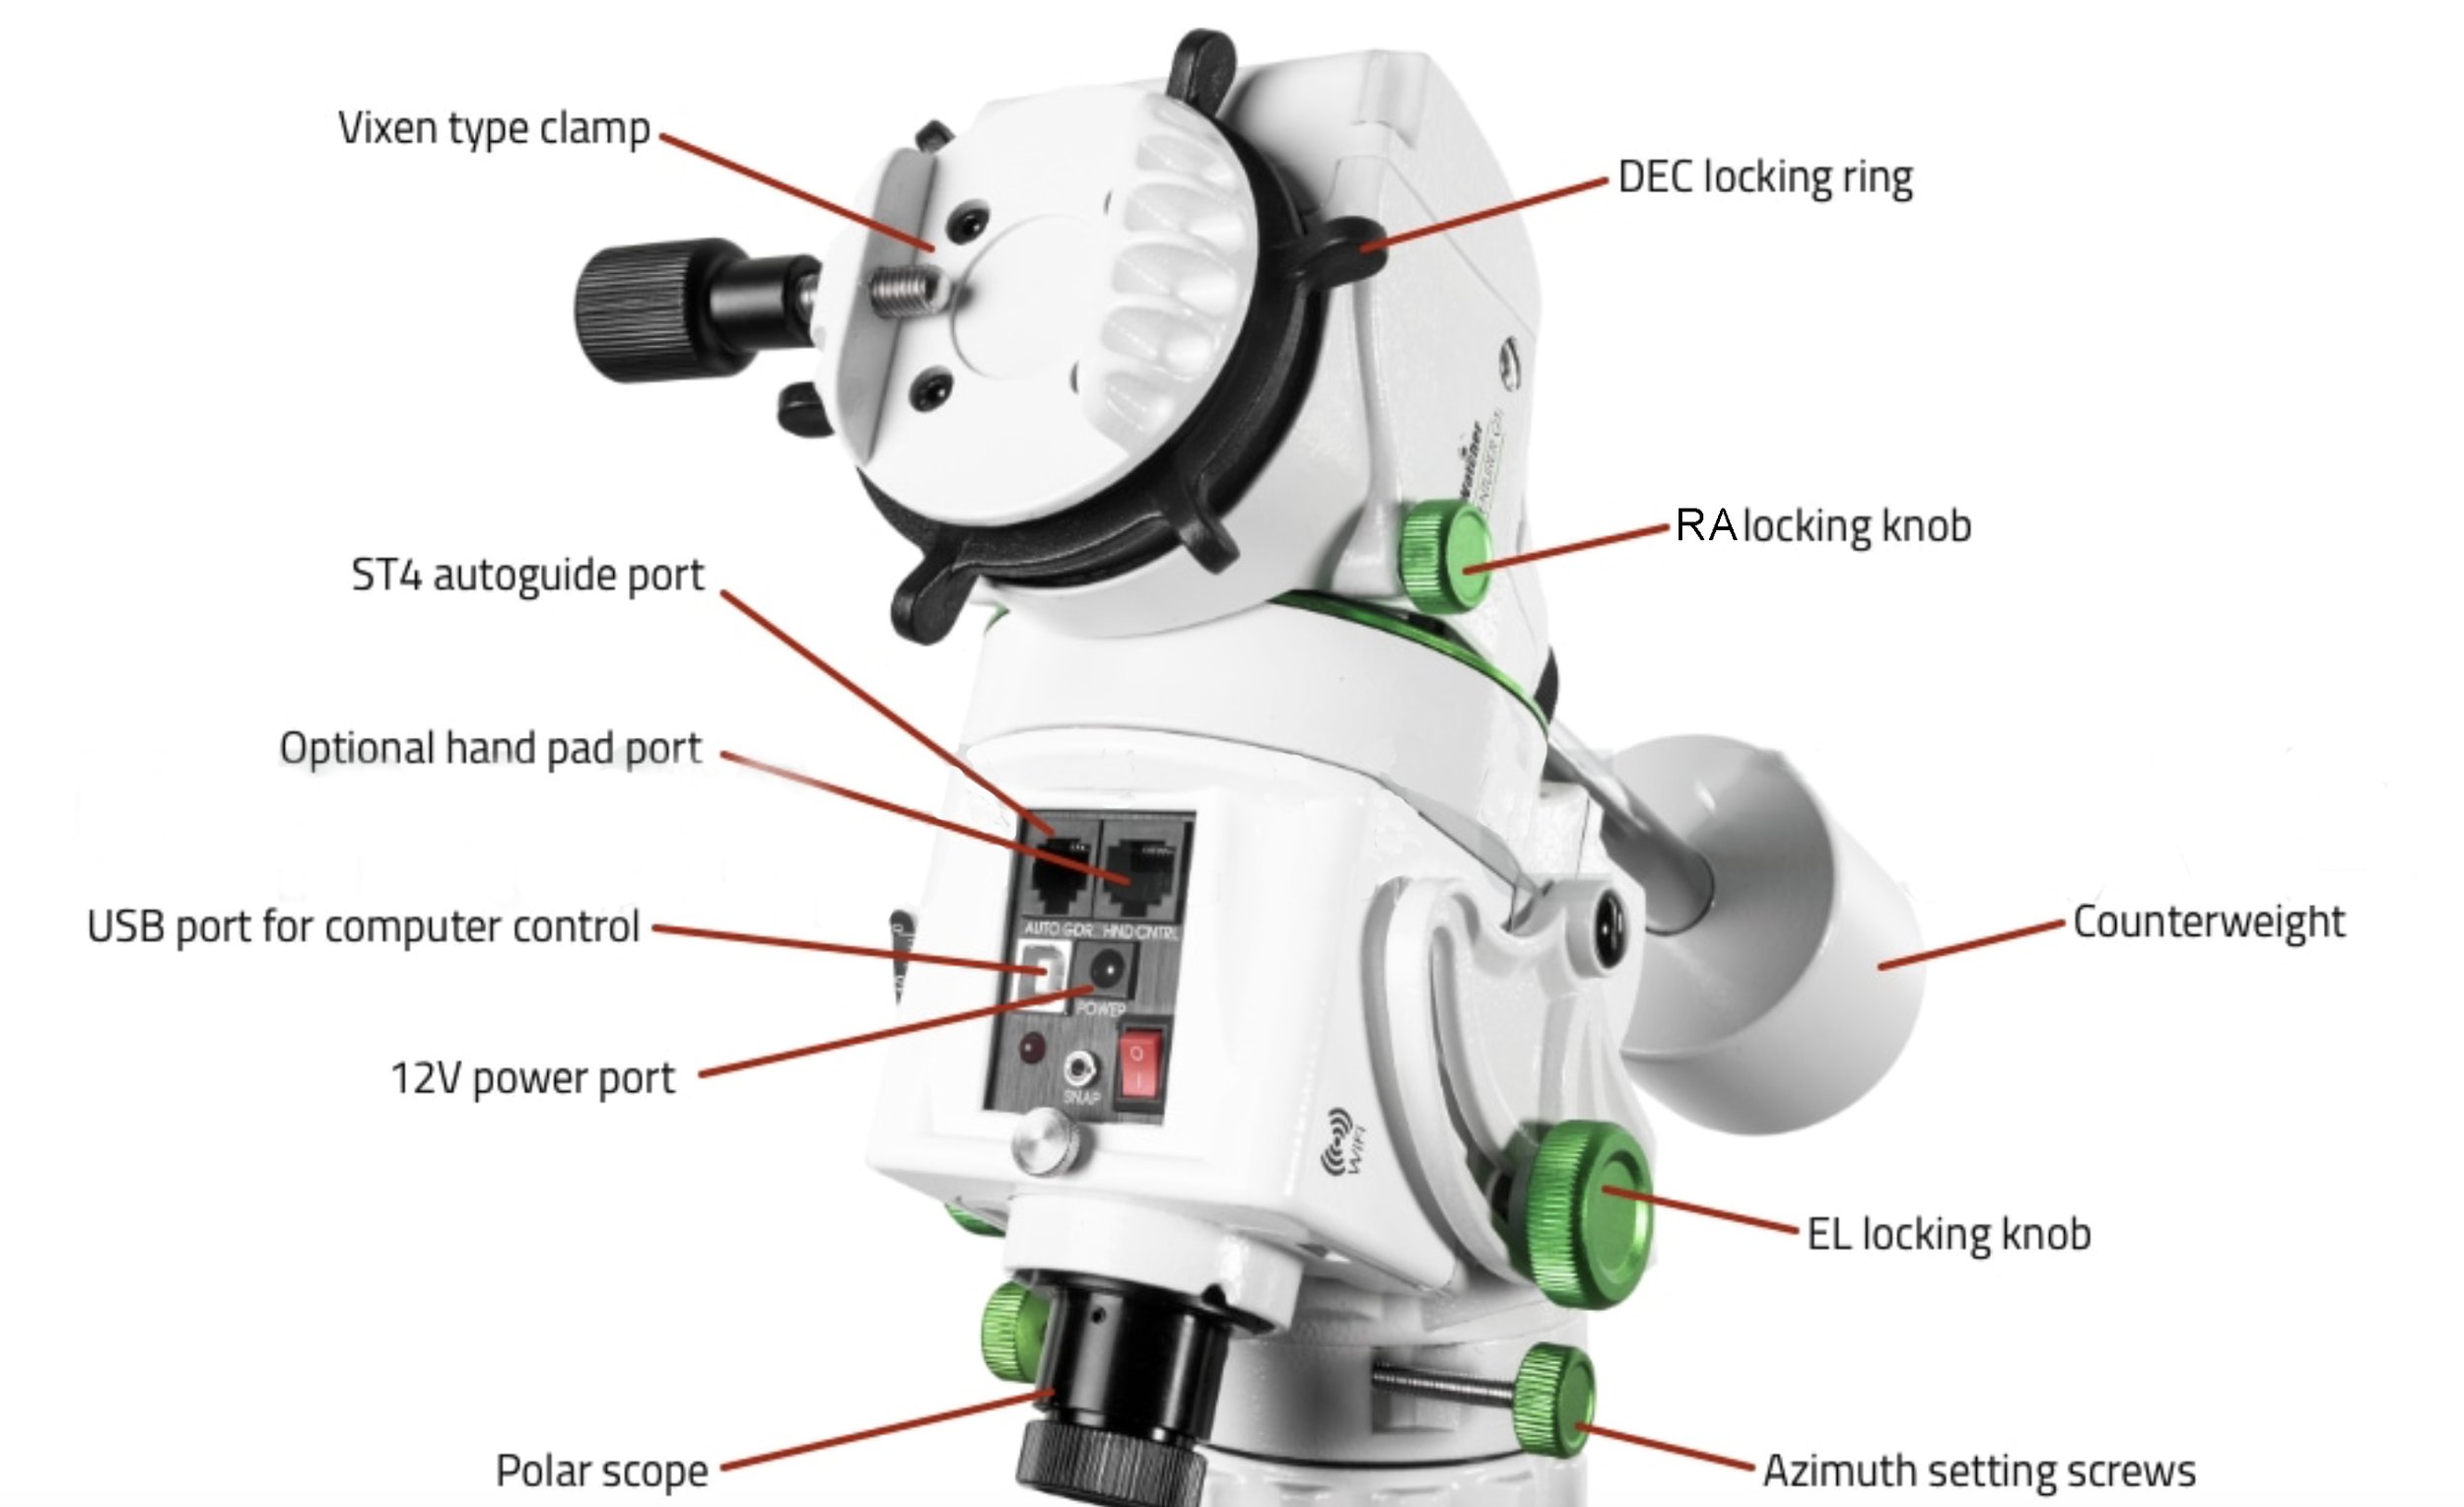
Key features of the Sky Watcher Star Adventurer GTi
The Star Adventurer GTi mount head gets a big tick for portability. It is light and compact so would easily fits into a small bag or backpack. I tend tp kept separate from my camera equipment because it’s still a big chunk of equipment that you wouldn’t want nagging around next to delicate lenses. Without the counterweights it is very lightweight, weighing just over 2.5kg. The counterweight bar can be fitted into the mount in two positions so if you are in a low latitude location it doesn’t cause the counterweight to collide with the tripod. In the UK though this is not an issue.
If the internal batteries are used and a camera is used on its own internal batteries, it’s possible to have a completely wire-free setup. The GTi needs 8 AA batteries, which is double that of my Star Adventurer 2i. Batteries are inserted into two fairly cheap battery holders and held in place by a cover that is screwed onto the main body. Again this is an improvement over the 2i which uses a plastic clip on cover that is prone to be knocked off after a little use. The screw holding the battery compartment cover in place, however, is quite short and not captive so it is easy to drop and lose the thumbscrew. If the battery cover isn’t held firmly in place the batteries will not make contact with the unit and the GTi will not operate (the 2i in comparison continued to work without the battery cover). I have heard of some users keeping a roll of duct tape so that the cover can be secured should they lose the battery cover screw. In practice, I generally use the 12 VDC input to power the tracker from my battery back so I’m not likely to have to unscrew this in the field.
Unlike the Star Adventurer 2i, the Gti comes with an ingrated equatorial wedge - the separate wedge was always a bit of a weak point and my clamp assembly came loose a few times, causing errors in polar alignment and tracking. The integrated elevation and azimuth adjustments are an improvement over my previous Star Adventurer 2i.
Star Adventurer GTi has fully integrated equatorial wedge with altitude and azimuth adjustment and an integrated polar scope
The GTi has a Vixen-style dovetail clamp but the package does not include a dovetail rail. I had a spare dovetail from my Celestron NexStar 6SE which fits perfectly though. I have bolted an Arca Swiss clamp onto the dovetail bar so I can mount my camera without having to dismantle my existing lens feet or L-bracket.
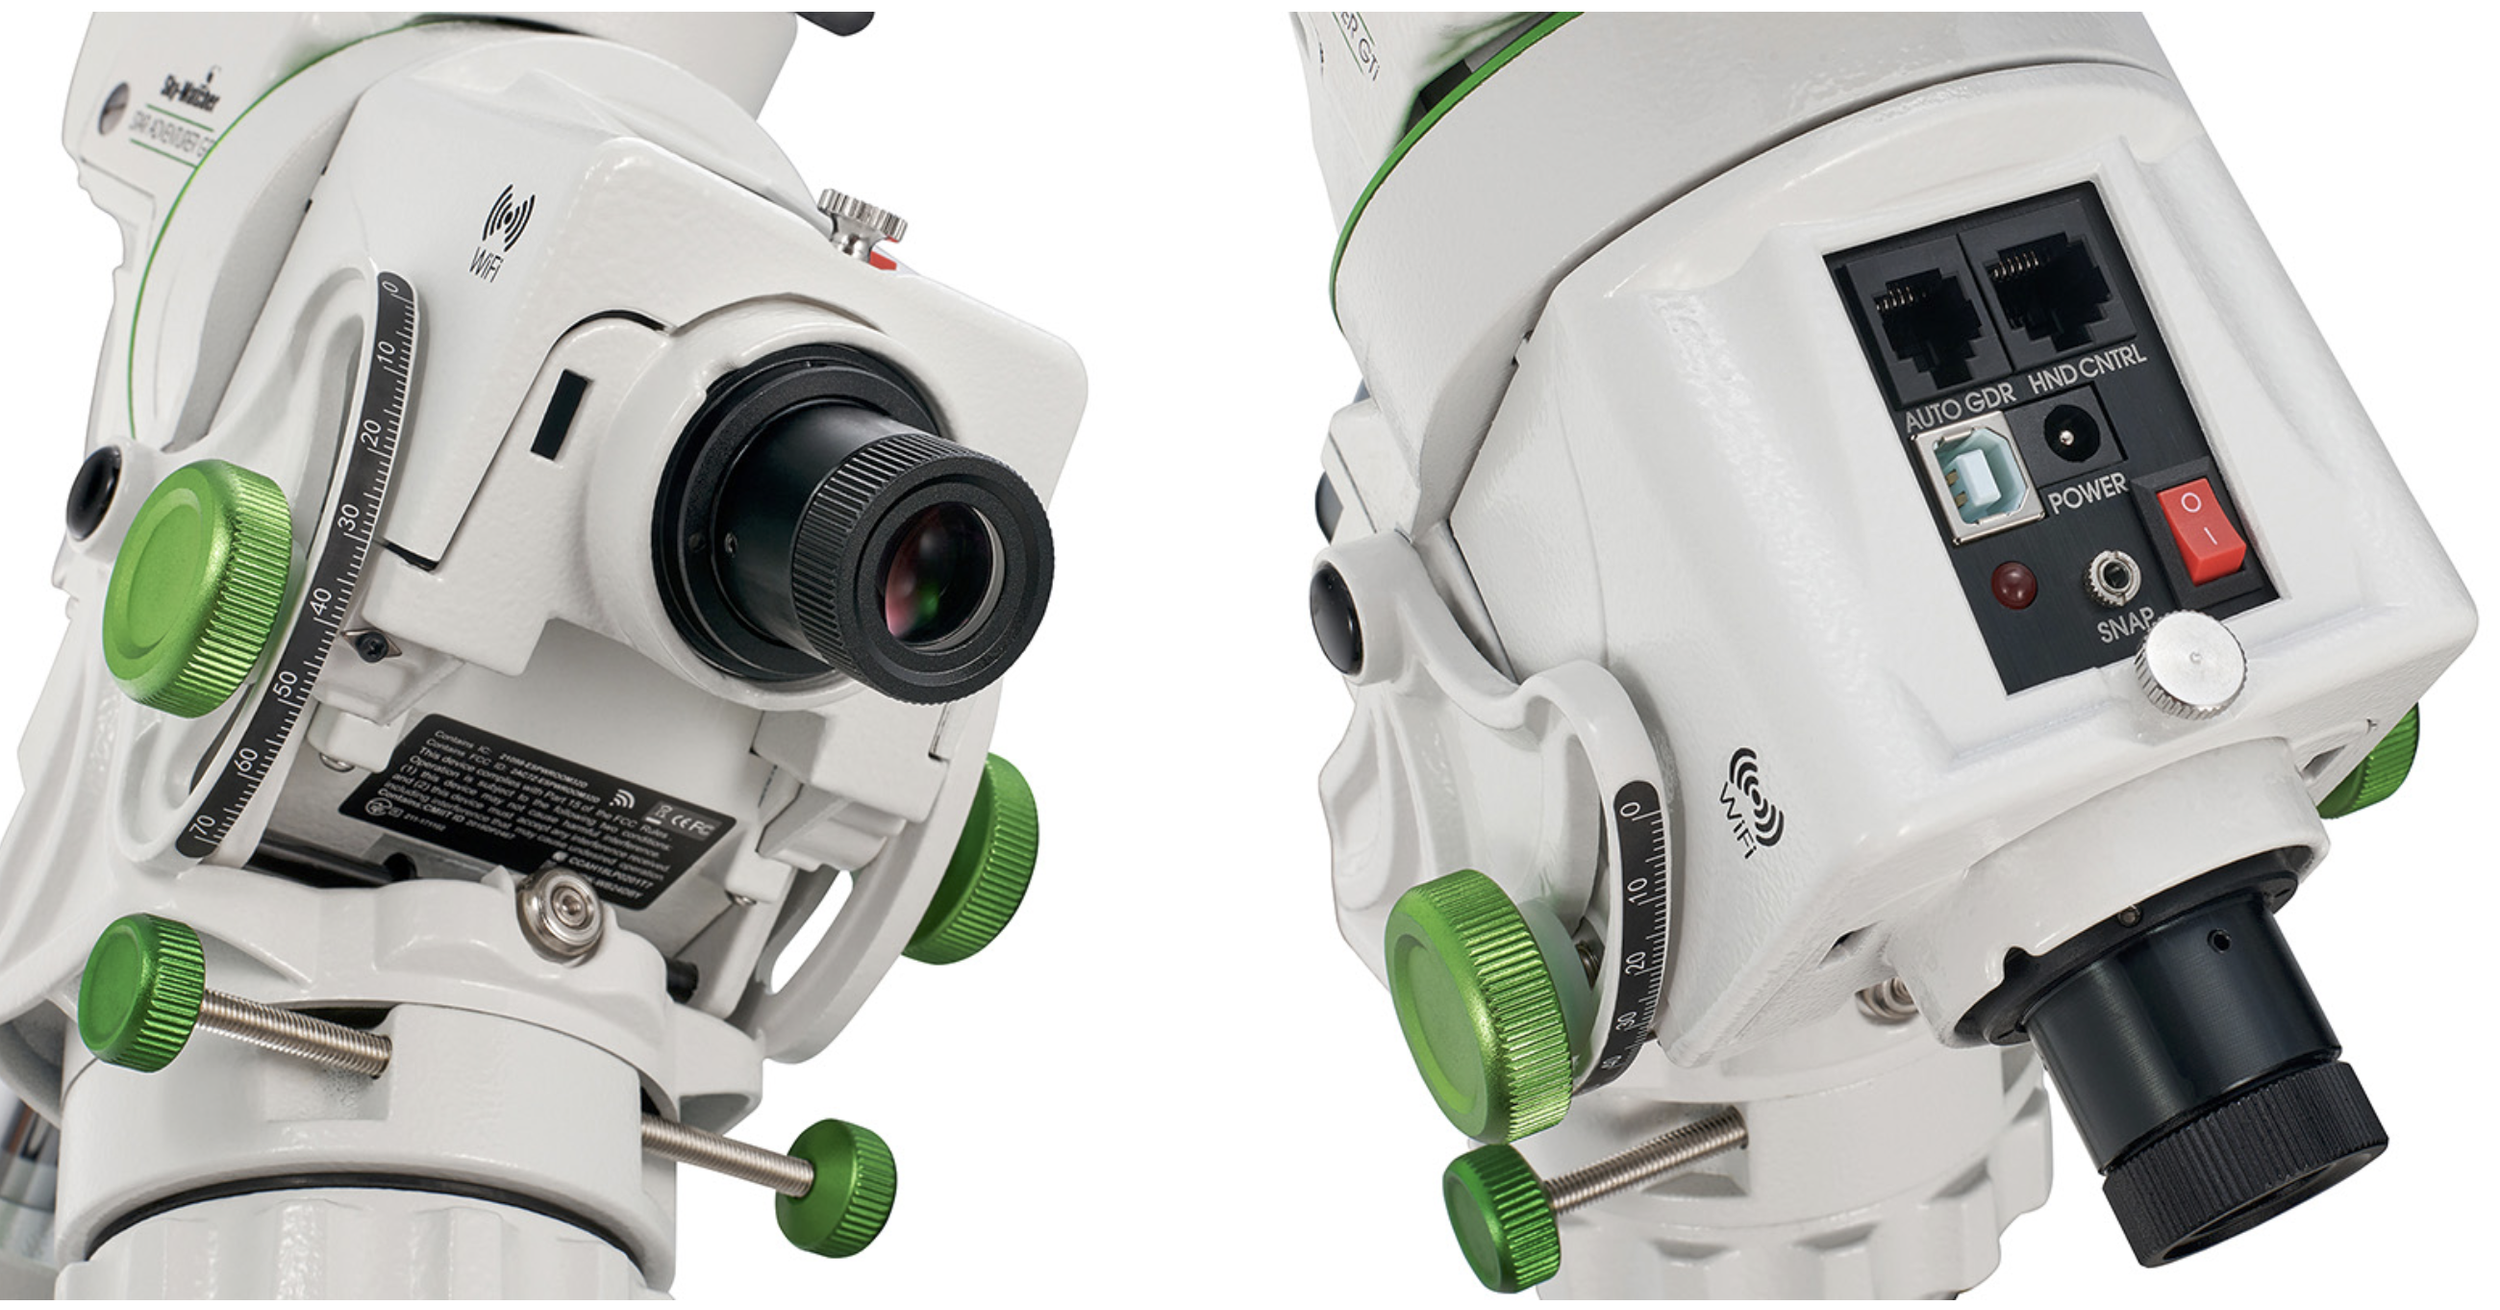
Another improvement over the other Star Adventurer line members is the polar scope illuminator, which is integrated into the body of the tracker. The Star Adventurer 2i required a separate illuminator, which was easily misplaced and had a poor on/off switch. The built in polar scope however requires that the declination axis is rotate so that the counterweight is horizontal. This allows the polar scope to view through a hole in the declination shaft otherwise it is blocked by the shaft. Anyone familiar with the larger Sky Watcher equatorial mounts will be aware of this, but it may cause confusion for those trading up from an earlier Star Adventurer.
This does mean it is necessary to move the mount from the home position (counterweight down pointing to the North Pole) in order to polar align the mount. This can causes some inconvenience if the mount isn’t correctly in its home position before switching on (more about this later). I have heard that it is possible to dismantle the saddle clamp by removing the four small Allen bolts and rotate it 90° before refiting. I haven’t tried this yet so can’t recommend it at present.
Connectivity
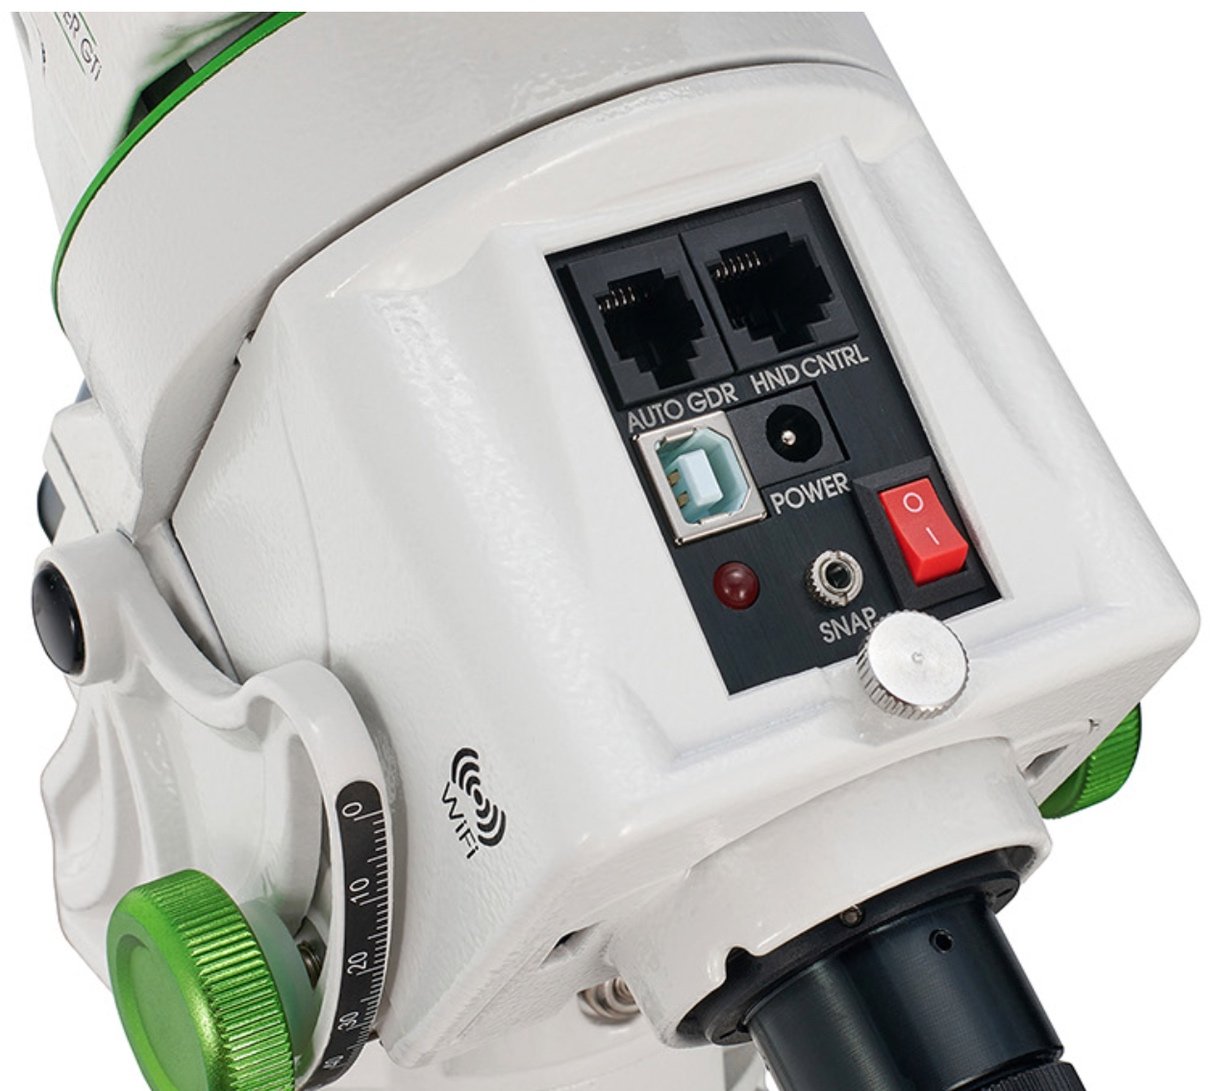
The Star Adventurer GTi comes with a wide range of connection options:
AUTOGDR - supports ST-4 autoguider input
HNDCNTRL - allows a standard SynScan hand controller to be used to control the mount and its GOTO features
USB 2.0 - for connection to a computer
POWER -allows a standard 12V dc power supply to be used with a 2.1ø x 5.5ø x 12mm centre positive DC jack plug. The power supply should be able to supply 2A.
SNAP - a 2.5mm jack socket to control a camera shutter release.
These are in addition to both 2.4GHz and 5GHz WiFi and Bluetooth allowing control from a smartphone, tablet or computer running the SynScan / SynScan Pro app. The GTi WiFi can also be set up in Station mode, allowing it to connect to your home WiFi so it is accessible from any network connected device running the SynScan Pro app. Station mode however is limited to 2.4GHz WiFi, preferring signal strength over data speed.
Operation
The Star Adventurer GTi does absolutely nothing when switched on - it just sits there. Unlike the 2i it has no mode dial of controls of any sort. Control of the mount is achieved using either a smartphone or tablet or computer running the free SynScan or SynScan Pro application (Windows and MacOS versions are available).
Once connected to the app the Star Adventurer GTi can operate in a number of modes:
Tracking
Operation as a tracker requires that the mount be correctly polar-aligned and then it simply rotate the Right Ascension (RA) axis to offset the rotation of the Earth. The Declination (DEC) axis is not moved at all, which is why most star trackers, like the Star Adventurer 2i, do not have a motorized Dec axis. The Star Adventurer GTi operates exactly in the same way when used as a simple star tracker. The accuracy of the guiding depends only on the accuracy of the polar alignment and the mechanical accuracy of the RA motor and gear system. Here the GTi has aa dinner drive wheel than the 2i (180 teeth rather than 140) so tracking accuracy should be improved over the 2i.
In addition, the GTi is able to be auto guided from a separate guide scope and camera feeding into the auto guider port, or using a computer controller via the USSB input. This will significantly improve the tracking ability of the GTi
By default the GTi is set up with No Tracking - to enable simple tracking you need to run the SynScan Pro app and connect to the Star Adventurer GTi WiFi and then select Utility, then Tracking and finally the tracking speed you require - sidereal for stars or lunar for tracking the moon. Note that solar tracking is not enabled by default (and not shown in the tracking list) for safety reasons. In fact the app will not allow GOTO functions within 5° of the sun to prevent eye or equipment damage. (You can manually slew to the sun using the slewing buttons so still need to be careful). To override this safety feature and enable solar tracking you need to go to Settings and then Advanced and select “Observe Sun”.

Utilities

Tracking

Select tracking speed
Go-To Equatorial Mount
In designing the Star Adventurer GTi for dual axis motors, Sky-Watcher went a step farther and integrated a fully computerised go-to controller. In this respect, the GTi is closer to the company’s EQ series of computer controlled equatorial mounts. This is again controlled via the SynScan Pro app and includes a library of stars, planets and deep sky objects..

Prior to using GOTO you will need to align the GTi against the sky using one of the alignment methods shown above.

Selecting Star allows you to choose solar system objects, named stars or double stars and visible comets

Deep Sky allows you to start typing to find yourr chosen object. You can choose from Messier, caldwell, NGC or IC databases
While the go-to capability of the tracker might at first seem to make it unnecessary to learn the sky yourself, the alignment procedures depend on you to initially point at bright stars which are listed by name. Unless you are familiar with the star patterns and names, you will need a star chart or app like Sky Walk or Stellarium showing the location of the brighter named stars. These may also be necessary even after alignment because the go-to accuracy is limited, making it necessary to first go-to a nearby bright star before using go-to to get to a dim target.
Limitations
The Star Adventurer GTi is an outstanding device combining the small size and weight of a star tracker with the advanced slewing functions of a computerised GOTO equatorial mount but there are a couple of limitations worth discussing:.
Firstly, when powered on, the tracker does nothing at all. You need to connect to the tracker with a phone/tablet or computer with the Sky-Watcher SynScan Pro) app to tell the mount your location (northern or southern hemisphere) and to start tracking (and at what speed). The previous Star Adventurer and Star Adventurer 2i had N/S buttons and a tracking mode dial that allowed you to start tracking without needing any additional equipment. The GTi could have had the N/S switch and a simple button on the mount which could be pressed to begin sidereal tracking, This would allow the GTi to mirror the functionality of the older Star Adventurers in circumstances where a simple star track was needed, e.g. nightscape or Millky Way photography.
As previously mentioned, the battery compartment screw is fiddly and easy to drop. If you are not careful it would be very easy to lose this screw. Without some means of holding the battery compartment cover firmly in place the battery holders will not make aa good contact with the GTi mount and prevent it operating. If you rely on battery power for the mount you need to be extremely careful when changing batteries to make sure this screw isn’t lost.
On a similar note, the polar scope cover cap still remains one of the cheapest components available. Like I mentioned in my Star Adventurer 2i review, the polar scope cap is easily detatched just by brushing past it. On the GTi though this is even worse - the cap is very difficult to keep in place once the batteries are installed. in fact the presence of batteries in the battery compartment prevents the cap spring clips from engaging at all.
Finally, it would have been nice if the GTi payload capacity was slightly greater. The payload is the same was that of the 2i, yet the mount appears to be a much sturdier design. Whilst this isn’t a major concern when using my cameras and photographic lenses it would have been nice to be able to mount my Celestron C6 Schimdt Cassegrain Cassegrain OTA onto the mount to allow better imaging than its current NexStar Alt-Az mount. This, coupled with a camera, guide scope, etc would exceed the 5kg payload capacity of the GTi. A couple more kgs would have made the world of difference !
For the early adopters though there is a significant issue - the RA Backlash adjustment screw tends to loosen due to the vibration of the mount. This can lead to significant amounts of backlash in the system. While you can adjust the crew relatively easy (by removing the large black sticker on the mount) it doesn’t cure the problem as the screw just loosens again over time. There have been numerous attempts to solve this using spring washers, thread locking compound and even plumbers tape that do reduce the issue but not cure it. This also requires dismantling the mount - there are some short fragile cables that may be damaged while doing this. With the updated, dual counterweight version Sky Watcher have changed the backlash adjustment mechanisms for both the RA and DEC axes and, so far, it appears to have solved the problem.
Conclusions
Despite the few little things I’ve noted, I’m extremely impressed with the Star Adventurer GTi. It fills provided dual axis motors and GOTO functionality in a small portable mount. The implementation as a well-integrated compact package with the easy to use SynScan Pro app sets this apart from the simpler star trackers available. The fact that Sky Watcher have improved the design and functionality of the GTi compared to the 2i at a relatively minor price increase is a pleasant surprise.